
Opening the Capture Wizard
Step 1 Open Receipts.
Tap your avatar in the top-left to open the drawer, then tap Receipts.
Step 2 Tap the + icon in the bottom bar.
A menu opens with Camera, Photo Library, and Import From Files.
Step 3 Choose your capture method.
Camera opens the device camera. Photo Library lets you pick an existing image. Import From Files brings in a PDF or photo from your device storage.
The 3-Step Capture Wizard
Step 1 — Photo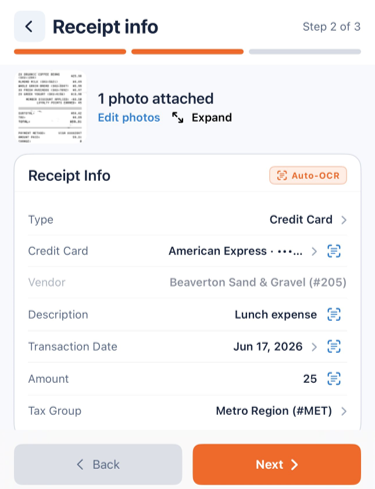
The camera opens. Take a photo of the receipt. Review the shot — retake if blurry, or tap + Add another for multi-page receipts. PDFs from email work in the same flow — choose Import From Files from the + menu instead of Camera.
Step 2 — Receipt info
Confirm or fill in the receipt header. Tap Auto-OCR to let the app read the image and pre-fill what it can:
- Method — Credit Card or Reimbursement.
- Credit Card — the card used, for credit-card receipts.
- Vendor — the supplier or store.
- Description — what the purchase was for.
- Transaction Date — when the purchase happened.
- Amount — the total.
- Tax Group — the tax region, if your company uses tax groups.
📝 Note | OCR pre-fills what it can. Look for the Auto-OCR badge on fields the app filled in automatically. Always glance at the amount before you continue — OCR is fast, not perfect.
Step 3 — Distributions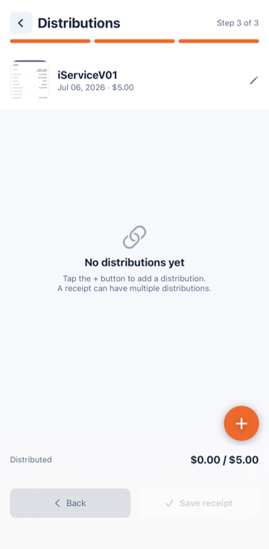
Tap the "+" button to start the Distribution wizard.
Add one line per cost split — a receipt can have multiple distributions.
The Distributed total at the bottom reads $0.00 / total until your lines add up, and the Save receipt button enables once they balance.
Saving the Receipt
If a save can't fully complete — for example, the receipt saves but its distribution lines don't — the app keeps your data and marks the receipt as failed/incomplete rather than losing it. Use the Failed filter on the Receipts list to find and finish it. A receipt is shown as saved only after everything syncs; "saved locally, sync pending" means the upload hasn't finished yet.
ℹ️ Good to Know
No signal? No problem. Capture and code receipts offline. They save locally and sync automatically when you are back online. The confirmation appears once the upload actually completes — that is expected.
The Receipt Detail Screen
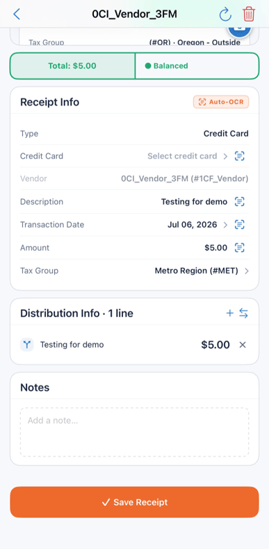 Once saved, the receipt opens in the Receipt detail screen until the AP team matches it to an invoice.
Once the receipt image is in, tap Auto-OCR on the Receipt Info panel and the app reads the image and fills in what it recognizes — including the Description and Amount — so you don't have to type them. Review the fields, especially the Amount, before you save.
Key elements:
|
Element |
Description |
|
|
Receipt image |
The photo or PDF at the top. Collapses to a strip when you scroll down — tap Expand to bring it back. |
|
|
Receipt Info panel |
Type, Credit Card, Vendor, Description, Transaction Date, Amount, and Tax Group. Watch for the Auto-OCR badge on auto-filled fields. |
|
|
Distribution lines |
Tap a line to open the bottom-sheet editor. Tap + to start the wizard for a new line. |
|
|
Total / Balanced banner |
Shows the receipt total with a Balanced indicator. Anything other than Balanced means your splits do not add up to the receipt total. |
|
|
Save Receipt |
Flat orange button at the bottom. After saving you see a toast and return to the list. |
|
Imported Documents module
Open Import Documents from the drawer. It has New and Uploaded tabs. Capture with the Add (+) icon — Camera, Photo Library, or Files. Offline, documents queue in the New tab and upload automatically when you're back online.
If an upload can't complete, the card returns to a "Ready to upload" state so you can retry — no error is shown.
An "Upload Imported Document?" prompt appears before uploading unless you've turned on immediate upload.