
How Lines Are Tracked
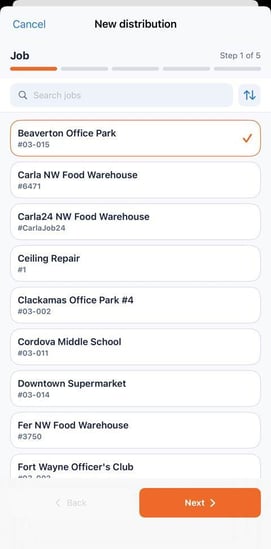 Each step shows a progress bar at the top so you always know where you are: Job → Cost Code → Category → Amount & Tax → Review. Your committed lines live on the Distributions screen you launched the wizard from — that screen lists every line and shows Distributed $X / total at the bottom. Tap + there to add another line, or tap an existing line to edit it.
The Five Steps
Step 1 — Job
Pick the job for this line. Use Search jobs to filter. The list defaults to the document's job, so the most common path is to confirm and move on — the selected job shows an orange check. Multi-organization users see only jobs from the active organization.
Step 2 — Cost Code
Pick the cost code for this line. Use Search cost codes to filter the master list. Each row shows the name and number — for example, Access Doors · #8-305.
Step 3 — Category
Pick the cost category — Equipment, Labor, Material, Overhead, Subcontracts, and so on. Use Search categories to filter. The GL account is derived automatically from your coding.
Step 4 — Amount & Tax
Enter the Amount and Units — Unit Cost fills in automatically (shown as AUTO). The Remaining after this line indicator turns green at $0.00 once the line uses up the rest of the document. Add a Tax Group if your company uses one, and the Tax, GST, PST, HST, and QST fields populate from it.
Step 5 — Review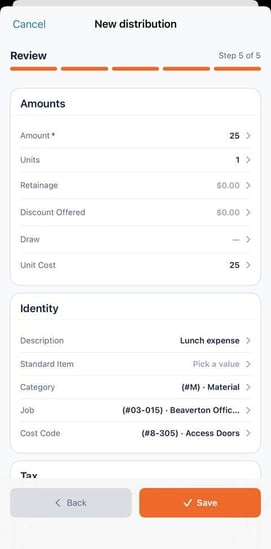
A read-only recap grouped into three cards — Amounts (Amount, Units, Retainage, Discount Offered, Draw, Unit Cost), Identity (Description, Standard Item, Category, Job, Cost Code), and Tax.
When everything looks right, tap Save on the bottom bar.
The Bottom Bar
The bottom bar of the wizard carries the action buttons:
- Cancel — discard changes and exit the wizard.
- Back — return to the previous step.
- Next — advance to the next step (Steps 1–4).
- Save — commit the line. Appears on the Review step.
- Save & add another — appears in add mode. Saves the current line and opens a fresh line.
- Delete — appears in edit mode, only on the Review step. Removes the line. You cannot delete the last remaining line — every invoice and receipt must keep at least one distribution. Add, Split, and Balance are read-only once an item is Approved.
|
⚠️ Important The Distributions screen has three controls for your lines: Add (+) to create a line, Split to split a distribution, and Balance (=) to redistribute the amount evenly across all lines (two or more lines required). All three work on every status except Approved, which is read-only. On the Amount & Tax step you can also watch the Remaining after this line indicator or type amounts directly. |
The Full Field List
The Distribution wizard exposes the full set of distribution fields. Your administrator controls the order and which fields appear:
Job, Description, Cost Code, Category, Standard Item, Amount, Pretax Amount, Units, Unit Cost, Retainage, Discount, Draw, Tax Group, Tax Amount, Tax Liability, PST / GST / QST / HST, Equipment, Equipment Cost Code, Work Order, Odometer, Location, Department, AP Account, Expense Account, Authorization, Commitment, Commitment Item, Misc. Entry 1, Misc. Entry 2, Misc. Deduction 1, Misc. Deduction 2.
If a field you need is missing, contact your hh2 administrator.
Commitments: If you pick a Commitment that has only one Commitment Item, that item is applied automatically. Selecting a Commitment Item fills in its Job, Cost Code, and Category and locks those three fields on the line — tap any of them and the app explains they are set by the Commitment.